THE TECHNIQUE OF ICONOGRAPHY
PREPARING THE BOARD
At first we begin by sanding the surface of the board we have chosen with fine sandpaper in order to attain a smooth finish. Then we coat it with fine fabric, such as cotton or linen, dipped in lukewarm rabbit skin glue. When the glue dries, we cut off the excess fabric hanging over the board and apply the ground that we are going to paint on as follows: We mix gesso or stucco with rabbit skin glue and apply several criss crossed coats making sure each dries before the subsequent coat is applied. After all the layers have dried we sand the ground with fine sandpaper to obtain a very smooth surface. The board is now prepared and ready to be painted on.
PLACING THE SKETCH
The next step is to make a rough sketch of the Saint or scene we are going to paint. First we draw the sketch adjusting it proportionately to the space we have been given. The composition is one of the basic elements that contribute to the final aesthetic of the icon. After we transfer the composition to the board we can start painting the background with blue or an ochre color, or prepare the surface for gilding.
GLIDING THE BOARD
Using the technique of oil gilding we apply several coats of shellac to insulate and smooth the surface. Then we apply a glue, called “mixion” which is specifically used for oil gilding. After 12 hours we can apply the gold leaf. Another gilding technique, the traditional one, is water gilding. Instead of “mixion” we use water, “raki” or vodka as a binder and then we burnish the gold with an agate stone. The preparation of the ground is the same as for oil gilding but requires more layers of gesso and must be done with great precision and care because the surface we are going to gild must be absolutely smooth. For this technique we use bole instead of shellac. Bole is a paste of different colors diluted with the white of the egg, as a kind of bedding, so as to fuse with the gold when burnished with the agate stone.
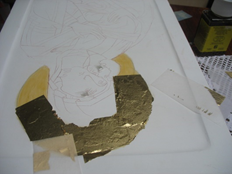
This technique is followed by very few iconography painters as it requires a great deal of experience. There are also many technical difficulties involved in its successful application. The gold we use is 24 carat, of greater thickness than most. After gilding we are ready to begin painting the icon.
PAINTING THE ICON
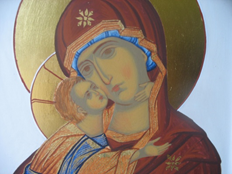
Egg tempera is the basic medium for icon painting. By using egg yolk diluted with water and vinegar, and adding natural pigments we create different color tones. I never use acrylics or industrial colors because they not only fail in reflecting the color tones but they also fade after a while. The natural pigments used by the first iconographers have retained their original color, allowing us to admire their work throughout the ages. Sarcomata as well as vestments, are painted in successive layers of color, creating subtle gradations from dark to light.

THE “SARCOMATA”
The “proplasmos” is the dark base color painted over the entire face and it is the tone that remains in the shaded area at the end. At the next stage we proceed with the “grapsimo”( painting of the outline, with a very thin brush ) of the eyes, nose, ears and eyebrows in a dark color. The “grapsimo” requires great attention for it is the means of conveying the expression of the Saint. The eyes are painted larger than the norm in order to accentuate their expression more intensively. The pupils of the eyes also become more elliptic.
Next we make the “sarcoma” using a mixture of the “proplasmos” and flesh tones. In order to even out the meeting points, a medium tone is applied, called “glykasmos”. Later “photismata” are applied adding a little white to the flesh color. We apply as many “photismata” as it takes for the volume of the face to be satisfactory. The hair is painted using the same technique.
At the final stage we apply “psimythies”, which are white lines added to highlight the “photismata”. With “psymmithies” we can significantly affect the facial expression. Their application requires a great deal of attention and detail, using fine brush strokes loaded with as little paint as possible.
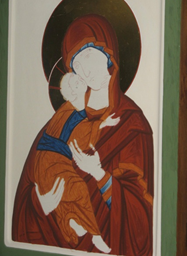
VESTMENTS
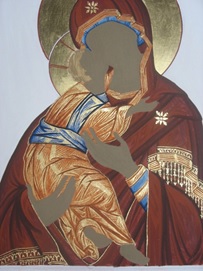
“Proplasmos” : I paint the entire surface of the vestments in the color tone we wish to remain in the shaded area. Next,lighten the color of “proplasmos” with white or an other light color and apply the first “lama” (highlights). We proceed with the second and third “lama” keeping part of each previous one uncovered. As a final step we apply the “psymmythies” in a near white color. If the vestments need thin gold decoration lines (“chrysokondylies” ) I proceed in drawing them and then gilding them with gold leaf. When the painting is finished I make the halos, the lettering and the margins. The halos can be gilded or painted in an ochre color.
The icon is now ready to be varnished. This ought to be done a few weeks later so that the chemical fusion of the egg and the pigments has been completed. After six months I can proceed with the final varnish. The varnishes I use are natural resins, applied lukewarm with a brush.